
You’ve decided to start a blog — great move. But now you’re staring at a screen wondering: what exactly is a domain? What’s hosting? And how do they even connect?
You’re not alone. Most beginners get stuck at this exact point, confused by technical jargon and overwhelmed by too many options. The good news? Buying a domain and setting up hosting is actually straightforward once someone walks you through it clearly.
In this guide, you’ll learn exactly how to buy domain and hosting for a blog — from picking the right name to going live — without wasting money on things you don’t need. Let’s get into it.
How Do You Buy Domain and Hosting for a Blog?
To buy domain and hosting for a blog, choose a domain name at a registrar like Namecheap or GoDaddy (around $10–15/year), then sign up for a hosting plan with providers like Bluehost or Hostinger (from $2–5/month). Connect the domain to your hosting via nameservers, install WordPress with one click, and your blog is ready.
Domain vs Hosting — What’s the Difference?
This is the number one thing that confuses beginners, so let’s clear it up with a simple analogy.
Think of your domain name as your home address — it’s what people type into a browser to find you (e.g., yourblog.com). Think of web hosting as the actual land and house — it’s the server where all your blog’s files, images, and content are stored.
You need both to have a live website. One without the other gets you nowhere.
Here’s a quick breakdown:
| Domain | Hosting | |
|---|---|---|
| What it is | Your web address | Your server space |
| Who provides it | Registrars (Namecheap, GoDaddy) | Hosting companies (Bluehost, SiteGround) |
| Typical cost | $10–15/year | $2–10/month |
| Renewal | Annually | Monthly or annually |
Some hosting providers bundle a free domain in their first-year plans — which can save you money when starting out.
How to Choose the Perfect Domain Name
Your domain name is your blog’s brand. Choosing it well from day one saves you from a painful rebrand later. Here’s what to keep in mind:
Keep it short and easy to type. Aim for 6–14 characters if possible. Shorter names are easier to remember, easier to say out loud, and less prone to typos.
Use your niche keyword if it fits naturally. A blog about personal finance could use something like smartpennyblog.com. It helps with branding and gives a small SEO signal. But don’t force it — financetipsforeveryonewhowantstolearn.com is a disaster.
Stick with .com when possible. It’s the most trusted and recognized extension globally. If your .com is taken, .co, .blog, or .net are decent alternatives. Avoid obscure extensions unless you have a strong reason.
Avoid hyphens and numbers. best-finance-tips-4-you.com looks spammy and is hard to say verbally. Clean names only.
Check social media availability. Before you commit, search the name on Instagram, X (Twitter), and Facebook. Consistent handles across platforms strengthen your brand.
Free domain name tools to use:
- Namecheap’s domain search — instant availability check
- Lean Domain Search — generates hundreds of
.comideas from one keyword - Bust a Name — filters available names by length and keywords
- Panabee — also checks social media handle availability
Best Places to Buy a Cheap Domain in 2026
Not all registrars are created equal. Some bait you with a cheap first year, then spike the renewal price. Here’s an honest look at the best options:
Namecheap — Best overall for cheap domains
Namecheap consistently offers some of the lowest domain prices, with .com domains starting around $8–10/year on first registration and reasonable renewals (around $13–15/year). Their interface is clean, and they include free WhoisGuard privacy protection — a feature some registrars charge extra for.
GoDaddy — Most popular, use with caution on renewals
GoDaddy is the world’s largest registrar and offers great first-year deals (sometimes as low as $0.99 for the first year). The catch? Renewal prices can jump to $20+/year. Always check the renewal price before registering.
Google Domains (now Squarespace Domains) — Clean and transparent
Google’s domain service was acquired by Squarespace. Pricing is transparent with no trick introductory rates — what you pay year one is what you pay every year. Great for bloggers who hate surprises.
Cloudflare Registrar — Absolute cheapest renewals
Cloudflare sells domains at cost — meaning no markup. If you want the cheapest long-term domain cost, Cloudflare is hard to beat. However, it’s slightly more technical than the others.
Pro tip: Many hosting providers (Bluehost, Hostinger, SiteGround) offer a free domain for the first year with any hosting plan. If you’re buying hosting anyway, take advantage of this before paying separately for a domain.
Best Hosting for Bloggers in 2026
Choosing the right hosting plan is more important than most beginners realize. A slow host means a slow blog, and a slow blog loses both readers and Google rankings.
Here’s what to look for in a good beginner hosting plan:
- Uptime guarantee of 99.9% or higher
- Loading speed under 2 seconds
- One-click WordPress installation
- Free SSL certificate (for HTTPS security)
- 24/7 customer support
- Affordable entry price with reasonable renewals
Bluehost — Best for absolute beginners
Bluehost is officially recommended by WordPress.org and is one of the most beginner-friendly hosting providers in existence. Their shared hosting starts at around $2.95/month (promotional rate), includes a free domain for the first year, a free SSL certificate, and a one-click WordPress installer.
Customer support is available 24/7 via live chat and phone. If you’ve never set up hosting before, Bluehost’s dashboard makes the process nearly foolproof.
Best for: First-time bloggers who want guided setup and reliability.
Hostinger — Best value for money
Hostinger consistently offers some of the cheapest hosting plans without sacrificing performance. Their basic shared hosting starts as low as $1.99–2.99/month, and they’ve invested heavily in their infrastructure — their servers are genuinely fast for the price.
They also have an AI website builder and a clean hPanel dashboard that rivals Bluehost for ease of use.
Best for: Budget-conscious bloggers who still want decent performance.
SiteGround — Best for performance and support
SiteGround is known for exceptional speed and customer service that actually resolves problems. Their hosting starts at around $3.99/month and includes features like daily automatic backups, a built-in CDN, and WordPress staging environments.
They’re slightly pricier than Bluehost and Hostinger, but bloggers who have outgrown cheap hosting often migrate here.
Best for: Bloggers who prioritize speed, security, and quality support.
WP Engine — Best managed WordPress hosting
WP Engine is premium managed hosting — they handle all WordPress updates, security, and performance optimization for you. Plans start at around $20/month, making it overkill for a brand new blog, but an excellent upgrade destination once you’re getting consistent traffic.
Best for: Established bloggers generating income who want hands-off server management.
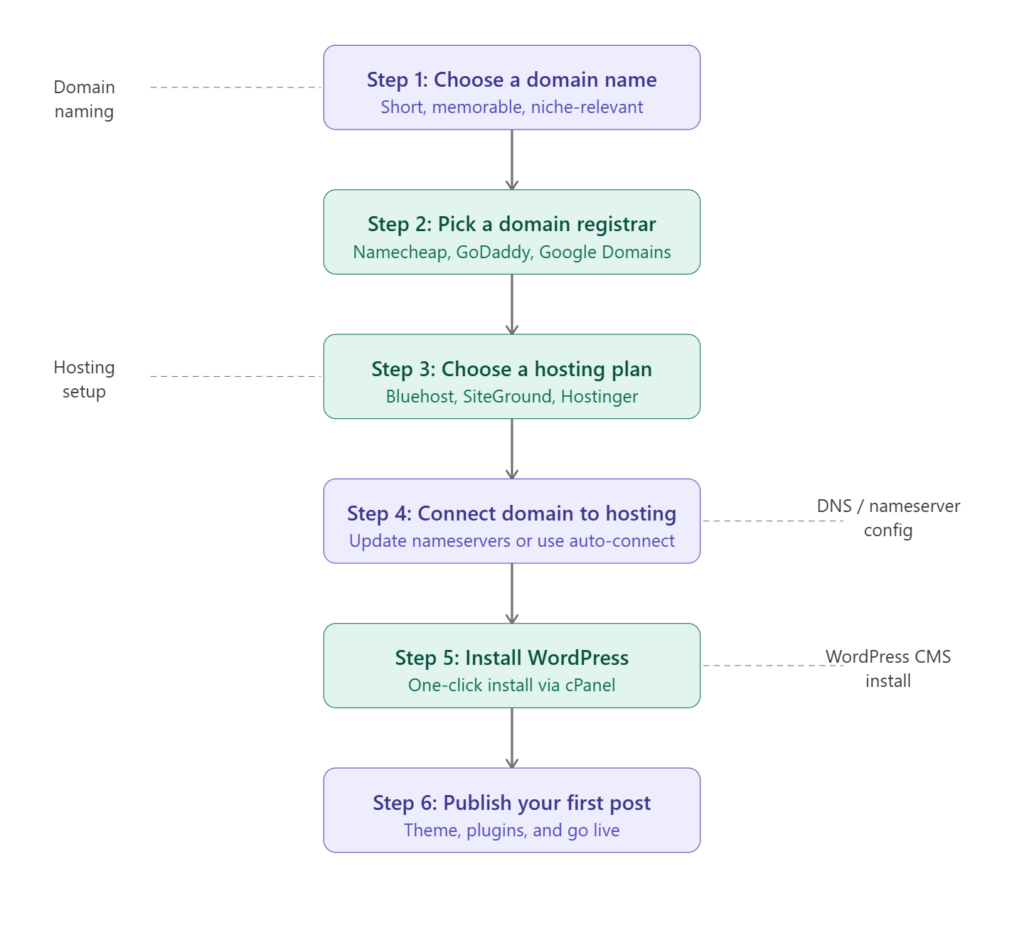
Step-by-Step: How to Buy Domain and Hosting for a Blog
Let’s walk through the entire process from scratch.
Step 1 — Choose and register your domain name
Go to Namecheap (or your preferred registrar) and search for your chosen domain name. If it’s available, add it to your cart.
During checkout, you’ll be offered add-ons like privacy protection (WhoisGuard), domain backups, and email hosting. Privacy protection is worth enabling — it hides your personal contact information from public WHOIS databases. Most other upsells you can skip.
Complete purchase. You now own that domain name for one year (renewable annually).
Step 2 — Choose and purchase your hosting plan
Go to Bluehost, Hostinger, or SiteGround. For a new blog, a shared hosting plan is all you need — don’t pay for VPS or dedicated hosting until you’re getting thousands of daily visitors.
Select a plan (Basic or Starter tiers are sufficient), enter your billing details, and complete the purchase. If the hosting provider offers a free domain, you can register your domain here instead and skip the separate registrar step.
Step 3 — Connect your domain to your hosting
This is the step most beginners get stuck on. If you registered your domain separately from your hosting, you need to point your domain to your hosting server using nameservers.
Log into your domain registrar’s dashboard, find your domain, and look for “Nameservers” or “DNS Settings.” Replace the default nameservers with the ones provided by your hosting company (they look something like ns1.bluehost.com and ns2.bluehost.com). Save the changes.
DNS propagation takes anywhere from 15 minutes to 48 hours — though most modern providers update within an hour.
If you registered your domain through your hosting provider, this step is already done automatically.
Step 4 — Install WordPress via your hosting dashboard
Log into your hosting control panel (cPanel or hPanel). Look for a “WordPress” icon or a “One-Click Installer” section. Click install, choose your domain from the dropdown, set your admin username and password, and hit install.
In under two minutes, WordPress is fully installed and you can log in at yourdomain.com/wp-admin.
Step 5 — Install an SSL certificate
An SSL certificate secures your site with HTTPS, which is both a trust signal for visitors and a Google ranking factor. Most hosting providers include a free Let’s Encrypt SSL certificate that can be activated with one click inside your control panel.
Once activated, your blog will load as https://yourdomain.com instead of http://. This is non-negotiable in 2026 — never launch a blog without SSL.
Step 6 — Choose a theme and publish your first post
Inside WordPress, go to Appearance > Themes to install a free theme. For beginners, Astra, Kadence, and GeneratePress are all excellent lightweight options. Customize your colors, fonts, and layout, write your first blog post, and hit publish.
Congratulations — your blog is live.
How to Connect Your Domain to Hosting: Nameservers Explained
Nameservers are simply the bridge between your domain and your hosting server. When someone types your domain into a browser, nameservers tell the internet which server to load your website from.
Here’s the exact process:
- Log into your domain registrar (e.g., Namecheap)
- Navigate to your domain dashboard and click “Manage”
- Find the “Nameservers” section
- Select “Custom DNS” or “Custom Nameservers”
- Enter the nameservers from your hosting provider (found in your hosting welcome email or control panel)
- Save and wait up to 48 hours
If your domain and hosting are with the same provider, this connection happens automatically — no manual steps required.
Hosting Setup Tips That Actually Make a Difference
These are things experienced bloggers wish someone had told them at the start:
Enable automatic backups from day one. Most hosts offer daily or weekly backups. Turn this on before you publish a single post. If your site breaks (and eventually, something always goes wrong), a backup is your safety net.
Use a caching plugin immediately after installing WordPress. Plugins like WP Rocket or the free W3 Total Cache dramatically speed up your blog’s loading time. Speed affects both user experience and Google rankings.
Set up Google Analytics and Google Search Console as early as possible. These free tools show you how much traffic you’re getting and which posts Google is indexing. The sooner you install them, the sooner you have data to work with.
Use a strong, unique password for your WordPress admin account. admin123 is not a password. Use a password manager like Bitwarden to generate and store strong credentials.
Install a basic security plugin. Wordfence (free) adds a firewall and malware scanner to your WordPress site. It takes five minutes to set up and blocks a significant amount of automated hack attempts.
Common Mistakes Beginners Make With Domain and Hosting
Paying for hosting you don’t need yet. Shared hosting is all a new blogger needs. VPS hosting, cloud hosting, and managed WordPress plans are powerful — but they’re for blogs with real traffic. Start small and upgrade when the need is actual, not hypothetical.
Choosing a domain name that’s too similar to an existing brand. Before you register, Google your chosen name to make sure you’re not accidentally mimicking a trademark. This can cause legal headaches down the road.
Forgetting to enable auto-renew. Domains and hosting expire. If you forget to renew and your domain lapses, someone else can register it — and buying it back from a domain squatter is expensive. Enable auto-renew for both.
Ignoring the renewal price. Always check what a domain or hosting plan costs at renewal, not just year one. A $0.99 domain might renew at $25. A $2.95/month hosting plan might renew at $10.99/month. Budget for the real cost.
Buying too many domains “for protection.” New bloggers often buy five variations of their domain name. Unless you’re running an established business, one domain is enough. Focus on building the blog, not accumulating unused assets.
Pro Strategies for Domain and Hosting Setup
Buy a hosting plan annually, not monthly. Monthly billing costs significantly more over a year. Most hosting providers offer their best rates on 12 or 24-month plans. If you’re committed to blogging, the annual plan saves you 30–50%.
Use your hosting provider’s free domain offer strategically. Free domains through hosting are almost always .com and registered for one year. The catch is that when you transfer it away from the host in the future, there can be small friction. It’s worth it for the savings at the start, but be aware.
Check if your host has a data center near your target audience. Hosting server location affects loading speed. If your audience is in Kenya, a server in Johannesburg will load faster than one in the US. Providers like SiteGround and Cloudways let you choose your data center region.
Use Cloudflare (free tier) on top of your hosting. Cloudflare acts as a CDN (Content Delivery Network) — it caches your blog content across global servers so pages load faster for readers regardless of their location. It also adds an extra security layer against DDoS attacks. Setup takes about 15 minutes.
FAQ: How to Buy Domain and Hosting for a Blog
Q: Can I buy a domain and hosting from different companies? Yes, absolutely. Many bloggers buy their domain from Namecheap and hosting from Bluehost or SiteGround separately. You simply update the nameservers in your domain registrar to point to your hosting provider. It takes about five minutes and allows you to get the best price from each provider.
Q: What is the cheapest way to start a blog with domain and hosting? The cheapest route is to use a hosting provider like Hostinger (from $1.99/month) that includes a free domain in the first year. This brings your total first-year cost to under $25. Renewal costs will be higher, so always check the second-year pricing before committing.
Q: How long does it take to set up domain and hosting? The entire process — registering a domain, signing up for hosting, connecting the two, and installing WordPress — takes about 30–60 minutes for a first-timer. DNS propagation (the connection between domain and host) can take up to 48 hours, but is usually complete within one hour.
Q: Do I need a domain name to start a blog? Not technically. Platforms like Blogger and WordPress.com give you a free subdomain (e.g., yourblog.blogspot.com). However, for professional credibility, SEO authority, and long-term ownership, a custom domain is strongly recommended. At $10–15/year, it’s one of the best investments you can make in your blog.
Q: What is shared hosting and is it good enough for a new blog? Shared hosting means your blog shares a server with other websites. For a new blog with low traffic (under 10,000 monthly visitors), shared hosting is perfectly adequate and very affordable. As your traffic grows, you can upgrade to VPS or managed WordPress hosting.
Q: Is it safe to buy cheap domain hosting? Yes, as long as you stick to reputable providers. Namecheap, Hostinger, Bluehost, and SiteGround all offer affordable plans with solid uptime, security features, and customer support. Avoid unknown providers with no reviews or suspiciously low prices — they often have terrible uptime or hidden fees.
Conclusion: You’re Ready to Launch
Setting up domain and hosting sounds intimidating — but as you’ve seen, it’s really just a series of simple steps. Pick a clean, brandable domain name, choose a reliable and affordable host that fits your budget, connect the two via nameservers, install WordPress, and write.
The whole process takes less than an hour. The results can last a lifetime.
Here’s your quick action checklist to get started today:
- Search for your domain name on Namecheap or your chosen registrar
- Sign up for a hosting plan with Bluehost, Hostinger, or SiteGround
- Enable your free SSL certificate
- Install WordPress via one-click installer
- Pick a lightweight theme (Astra or Kadence)
- Write and publish your first post
The hardest part isn’t the setup — it’s starting. So close the other tabs, pick your domain name, and make it happen.
Read also:
- How to Create a Blog in 2026: The Only Step-by-Step Guide You’ll Ever Need
- How to Choose a Profitable Blog Niche in 2026 (And Actually Make Money From It)
- 7 Best Blogging Platforms for Beginners in 2026 (Honest Comparison)
- How to Start a Blog and Make Money in 2026 (Complete Step-by-Step Guide)